Introduction
Flight Package Layout
This topic will detail the options available for the Flight Package, including choosing a default layout and selecting package contents.
We estimate that this will take 3 minutes to complete.
Detailed Explanation
Flight Package Layouts
The Flight Package Layout gives you the ability to customize what is in an individual flight package.
In this topic, you will learn how to:
- Select another flight package layout
- View images in the flight package
- View content in the flight package
- Select content to add to the flight package
- Preview the entire flight package in the Reports screen or view the package in a text or .pdf format in a new browser window.
REMINDER
This topic is not to be confused with the Flight Package Layout tab, which is used to create new flight package layouts, or modify existing ones by adding, or removing components.
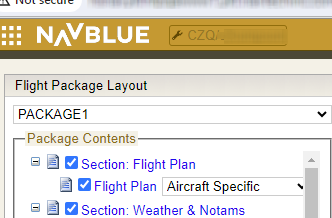
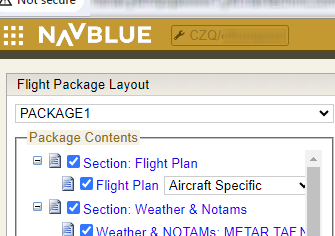
This is the list of available Flight Package Layouts (sorted alphabetically).

![]() Click the Flight Package Layout dropdown button.
Click the Flight Package Layout dropdown button.
Flight Package Drop-down List
If there are no Flight Package Layouts available, the dropdown list will include a single entry named Default Flight Package Layout, which corresponds to a default Flight Package Layout designed to mimic the current functionality.
Selecting a layout from the Flight Package dropdown list causes the Package Contents list to update to show the current contents of the selected layout.
![]() Click the PACKAGE1 list item.
Click the PACKAGE1 list item.
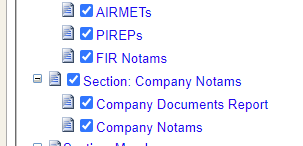
![]() Click the Weather & NOTAMs: METAR, TAF, Notam list item.
Click the Weather & NOTAMs: METAR, TAF, Notam list item.
Click on an item to view the contents.
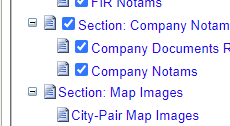
![]() Click the City-Pair Map Images list item.
Click the City-Pair Map Images list item.
If included in the flight package layout, the Custom Map Images and/or City-Pair Map Images nodes are displayed even when no corresponding map images exist.
![]() Click the Standard Map Images list item.
Click the Standard Map Images list item.
To expand or collapse a category, click on the '+' or '-' sign.
![]() Click the Attach button.
Click the Attach button.
The Attach button allows you to import documents to the Flight Package . The embedded documents appear in the Company Documents Report section you specified on the maintenance screen. Formats accepted are, .pdf, .jpg, .png and .txt. An Attach Company Document dialog will appear when you select the Attach button. Select Choose File to open up a dialog box to select your file, once selected you can add it by selecting the Upload button.
You must have Company Documents Report added to your flight package to add company documents.
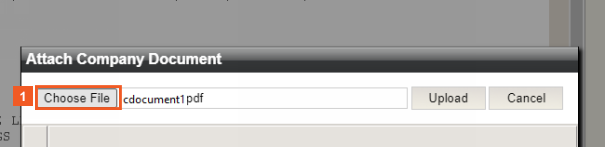
![]() Click the Choose File (browse) button.
Click the Choose File (browse) button.

![]() Click the cdocument1.pdf list item.
Click the cdocument1.pdf list item.
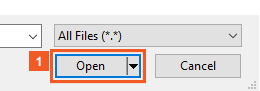
![]() Click the Open button.
Click the Open button.
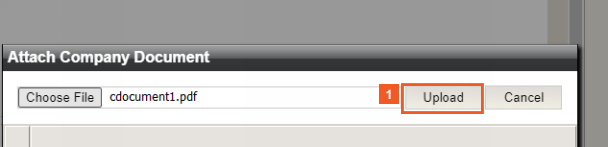
![]() Click the Upload button.
Click the Upload button.
![]() Click the cdocument.pdf list item.
Click the cdocument.pdf list item.
Every document that has been attached will appear under the Company Documents Report list item. For the purpose of this training, we will use the cdocument.pdf document.
Preview of document added. Documents are added to the end of the flight package.
![]()
Use the << and >> buttons, or the dropdown to view a different page in the package.

![]() Click the PDF button.
Click the PDF button.
Click the PDF button to view the flight package in .pdf form.
HINT
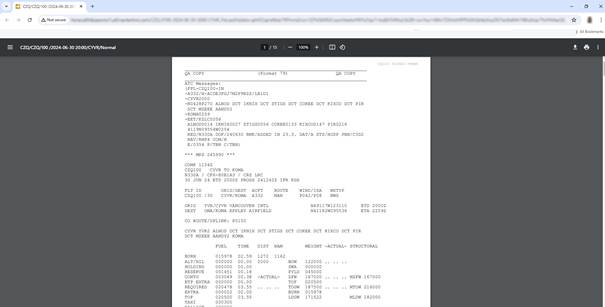
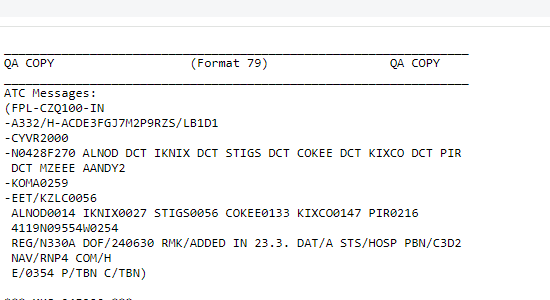
Images are included in the .pdf version. There are no images in the text version.

![]() Click the Text button.
Click the Text button.
HINT
Images are included in the PDF version. There are no images in the text version.

![]() Click the Preview Flight Package button.
Click the Preview Flight Package button.
Take note of the number of pages.
Click Preview Flight Package to view the entire package in the Reports screen.
There are now 102 pages in the package.