This program allows the user to create and maintain preferred entry routes that connect with a track structure. These may or may not be associated with a specific airport of departure. The Route Analysis program will search this file for preferred entries named in the Track Message, and will assemble routes containing the appropriate segments.
The available modes are:
Add
Edit
Delete
Video
Screen
Hardcopy
Quit
Add Mode
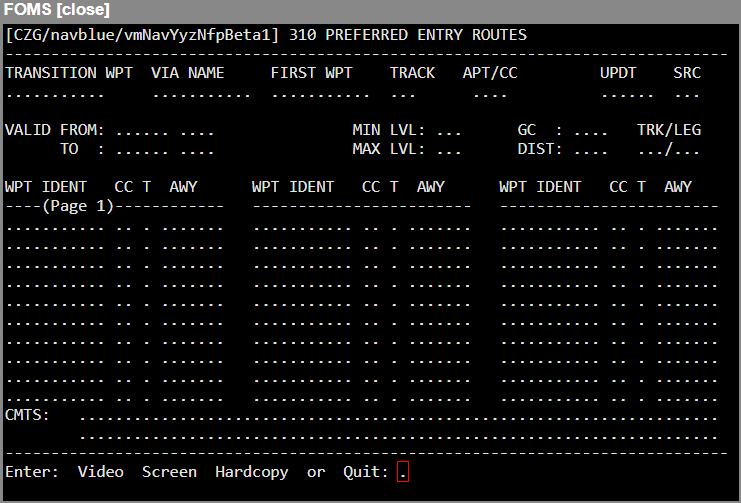
Field | Description |
TRANSITION WPT | Enter the identifier of the waypoint that marks the end of the Entry route, i.e., the waypoint at which this route will connect with a track structure. |
VIA NAME (WPT/AWY) | Enter the identifier of a specific ATC entry route, such as N41C. This field is optional. |
FIRST WPT | Enter the identifier of the First Waypoint in the route. If you intend to specify a SID, then the appropriate entry would be the SID Transition Waypoint. This field is mandatory. |
TRACK | Enter the name of the Track Structure with which this Entry is associated (NAT/PAC/AUS/NOR). |
APT/CC | This field is optional. If the Entry route is confined to use by flights originating at a particular airport or country, then you must enter the ICAO (or IATA) identifier for that airport or the country code for the country. |
SRC | Enter your initials to indicate the source of this record. |
UPDT (Update) | This is a display only field to indicate when the record was last edited. The current system date will be written to the record once it is saved. |
VALID FROM/TO | Enter the Valid From and Valid To dates and times (optional) in the format DDMMYY, HHMM. Note: If these fields are left blank, then the Route Analysis program will assume that the route is always valid. |
MIN LVL | Enter the minimum flight level. The range of permissible entries is 100 to 600. |
MAX LVL | Enter the maximum flight level. This entry must be greater than the value entered for MIN LVL. |
GC | The Great Circle distance from the origin to the last waypoint is calculated and displays once this information is entered. |
DIST | As each waypoint in the route is entered, the total distance from origin along the designated route will display. |
TRK/LEG | As an aid to route entry, the Great Circle Track and Distance between the last waypoint entered in the route table and the previous waypoint will display in these fields. |
WPT IDENT/CC/T/AWY | If a First Waypoint has been selected, then the first field in the route table will be filled with the ID of this waypoint. Otherwise, enter the First Waypoint in the route. The program will compute the direct distance from the Origin to this waypoint. Once there is no ambiguity, the Country Code and Type automatically fills in, if not, enter these values. Enter the name of the desired Airway. The <?> Search function may also be used in this field, if required.
Note: Since Preferred Entries are intended to define fixed routes published by ATC; MTTA may not be used as an entry in the Airway section of this program. Continue to enter waypoints and airways until the previously designated end waypoint is reached. At this point, the program will recognize that the route is complete, and will shift the cursor to the Comments field.
|
Comments | Enter any comments that you feel are pertinent. |
Edit Mode
Enter the Transition Waypoint, First Waypoint, and Track of the Entry route you want to edit. It will display on screen with the cursor positioned on the SID field for editing. Waypoints may be inserted or deleted using <Ctrl>-I or <Ctrl>-D to insert or delete lines in the route table. To move rapidly from line to line, you may use the Up or Down arrow keys. Pressing <Enter> will move the cursor across a line to access the Country Code, Type, and Airway fields.
When you are satisfied with your changes, you may exit to a confirmation prompt by using <Ctrl>-E. Any time you edit a record, the current system date will be written into the Date field.
Delete Mode
To delete an Entry route, enter the key information: Transition Waypoint, First Waypoint and Track. The route will display on screen, along with a Really DELETE? prompt. If you are satisfied that this is the record you want to delete, respond <Y>; otherwise enter <N> and you will be able to alter your selection.
Video Mode
In Video mode you may view a single record, or scroll through the file using the up and down arrow keys. If you are not sure of the Entry Name, you can enter any value: the program will return a Record Not Found - Press <ENTER> for NEXT AVAILABLE prompt. You may then press <Enter> and use the up and down arrow keys to view individual routes. If the route requires more than one page of table, you may view the second page by using <Ctrl>-F.
Pressing <Enter> while a route is displayed will clear the screen, but leave the cursor in the Origin field for a new input. Entering <Q>, on the other hand, will clear the screen and return you to a Command Line prompt.
Screen Mode
When you enter Screen mode, the report selector screen will display, allowing you to make the following entry options:
Field | Description |
TRANSITION WAYPOINT (RANGE) FROM/TO | You may choose the range of Transition Waypoints for which routes are to report. |
VIA NAME (WAYPOINT/AIRWAY) | You may filter the report to only those using a specific waypoint or airway. Note: The filter only scans for waypoints or airways that were designated in the appropriate input field. The report will not list those routes which may use the particular waypoint or airway, without this having been defined in the VIA field. |
First Waypoint | You may filter the report to include only those routes that use a specified First Waypoint. |
TRACKs | You may filter the report to show only routes that apply to a particular Track Structure NAT, PAC, etc. |
AIRPORT | You may filter the report to show only those routes applicable to a particular origin airport. |
Hardcopy Mode
This mode functions the same as Screen mode, with the exception that the output is directed to the printer.
Quit Mode
Entering <Q> from the Command Line will return the Next PROGRAM-NUMBER prompt so that you have the option of going directly to your next program if you know the menu number, or of returning to the previous menu if you simply press <Enter>.
Note: The following descriptions represent the typical access and privileges afforded to users designated as Dispatch Managers/Supervisors. Users with dispatcher privileges will have limited access to a subset of the screens presented.