Introduction
Route Building - Basic
This simulation is comprised of a step-by-step walkthrough showing how to build a practical route, including consideration of rules, and the method of efficiency. The Basic Route walkthrough shows functionality required for a domestic route within North America.
We estimate that this will take 4 minutes to complete.
What is MTTA?
MTTA creates a route using the following steps:
- Creates a list of all transition points of each SID to the transition points of all STARs (if available)
- Once it determines the first waypoint, it will determine the airway or direct legs that run from that waypoint
- Next it will determine the time to the next waypoint considering the user settings
- MTTA compares all options waypoint by waypoint and rejects ones with the greater time, fuel or cost (depending on user settings)
- Any route that is greater than 30% of the Origin to Destination distance is discarded.
The process is continued until all possibilities are tested, leaving the most optimal route with the least accumulated time, fuel or cost
What is MTTA Factor?
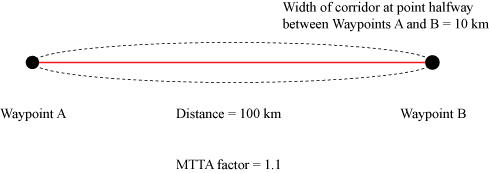
The MTTA search space allows you to configure the area of searchable between origin and destination. The greater the search factor, the more possible waypoints you can use in building your route. This value can be set within the range of 1.1-2.0.
For example, an MTTA factor of 1.1 tells the system to use a corridor width that is 10% of the distance between two waypoints at halfway between the two waypoints.
HINT
MTTA - will optimize using airways.
Detailed Explanation

![]() Click the New button.
Click the New button.
To begin, start in the Route screen, and click New.
HINT
If your company has stored routes, they will appear as a list on this screen.

![]() Click the Generate button.
Click the Generate button.
The route defaults to MTTA in the text box. You can paste a route you created into this box or use MTTA.
Optimized routes are based on four options: Least Fuel, Least Cost, Least Time, Least Distance.
HINT
You may select a SID/STAR or you can leave it blank and the MTTA will select the best available.
![]() Click the Apply button.
Click the Apply button.
Applying the route updates the Flight Plan, but it will not run a compute. This allows you to make additional changes to the plan as needed.

Your new route now appears in the Plan screen.

![]() Click the ORIG VIDP dropdown button.
Click the ORIG VIDP dropdown button.
This example demonstrates what happens when a route cannot be built.
Change the runway out of VIDP on this route using the same SID and transition.
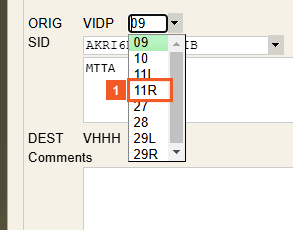
![]() Click the 11R list item.
Click the 11R list item.

![]() Click the Generate button.
Click the Generate button.
When the runway is changed from 9R to 11R, the SID turns red. This means that the SID is not available for that runway selection.

![]() Click Error message.
Click Error message.
An error is generated and displayed in the lower-left area of the application if you attempt a compute while the SID field is red. You will not be able to generate a Flight Plan.

When the initial error message notification is clicked, it expands to provide additional details. In this case, it advises the user to select a valid SID, as the prior attempt to perform a computation while the SID field is highlighted in red has resulted in the error and the Flight Plan not being generated.