Introduction
Reports Overview
This topic covers the Reports screen. You will learn how to generate, organize and send flight information.
We estimate that this will take 5 minutes to complete.
Detailed Explanation
Reports Screen
The Reports screen is designed to provide you with the tools required to build, validate, view, print, search, save, and file your flight package.
There are three groups within the Reports screen:
● Flight Package Layout group
● Enroute Stations group
● Display group.


Flight Package Layout Group
The Flight Package Layout group is displayed in a tree view, and offers the ability to customize what is included in the flight package.
Flight Package Drop-down List
This is the list of available flight package layouts (sorted alphabetically). If there are no flight package layouts available, the drop-down-list will include a single entry named Default Flight Package Layout which corresponds to a default flight package layout designed to mimic the current functionality. Selecting a layout from the Flight Package drop-down list causes the Package Contents list to update to show the current contents of the selected layout. To expand or collapse a category, click on the + or - sign to the left of the section header.
Package Contents List
The Package Contents list displays the components from the selected flight package layout in the order they have been set. This list is determined by the Package Contents list in the Package Definition group.
Click on a checkbox to select or deselect a component as part of the package.
If included in the Flight Package Layout, the Custom Map Images and/or City-Pair Map Images nodes are displayed even when no corresponding map images exist. In this case the flight package itself will not include corresponding empty sections as no map images have been selected.

Enroute Stations Group
The Enroute Stations group on the Reports screen allows you to enter up to twelve stations for the purpose of including weather for those stations in the flight package.
The order in which the weather stations are entered is insignificant. You can enter a weather station in any of the twelve boxes available.
If enroute stations are added or removed, the stations that remain appended to the flight are those that were present when the last flight plan/flight package/weather/NOTAMs were sent. If a flight is computed with additional stations, but is not sent, those stations are not included when the flight is reloaded.
If any of the enroute weather stations are modified when a report is being viewed, a green bar will be shown at the top left corner of the report that says the report needs to be reloaded. Clicking this bar reloads the report.
Display Group
The Display group on the Reports Screen displays the loaded elements of the flight package.
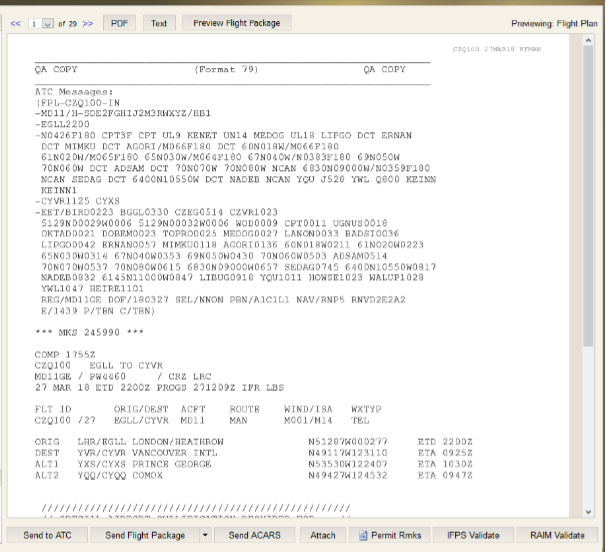
<<: Previous Page - Clicking on the Previous Page symbol brings up the previous page of the flight package.
>>: Next Page - Clicking on the Next Page symbol brings up the next page of the flight package.
The current and total page numbers are displayed between the previous and next buttons. You can use the drop-down menu to go directly to any page.
PDF: View as PDF - Click on the PDF link causes a PDF version of the flight package to be opened in a new window. See the CA48-ATC ICAO form for information on how to make the ATC ICAO form editable.
Text: Open as Text - Click on the Text button to open the Flight plan as a text file in a new web window. You can then print using standard browser print workflow.
Preview Flight Package: Click on the Preview Flight Package button to show the full flight package in the Display group.
Send to ATC/Confirm Buttons
The Send to ATC button opens the ATC Confirmation pop-up window. Once the ATC Confirmation dialog opens, the Send to ATC button changes to Confirm. Clicking on the Confirm button sends the ICAO ATC message to the recipients listed in the Send to ATC dialog. This button is disabled when running a test flight.
Send Flight Package Button
The Send Flight Package button allows you to send the entire flight package or selected portions of the flight package to the recipients listed in the Send Flight Package dialog. To send the entire package, select the Send Flight Package button (left side). Once the Send Flight Package dialog opens, enter the desired recipients and details on when to send the package, then press Send. To select a component or components to send, click on the drop-down arrow of the button (right side), and select one of the options (Send flight plan, Send weather, Send NOTAMs or Send Free Text). Once the Send Flight Package pop-up window opens, enter the desired recipients and details on when to send the package, then press Send. This button is disabled when running a test flight.
If you select Send NOTAMs using the dropdown arrow button, only Company and Station NOTAMs will be sent, not FIR NOTAMs.
Send ACARS Button
The Send ACARS button allows you to send an ACARS message to the recipients listed in the Send ACARS pop-up window.
Attach Button
The Attach button allows you to import documents to the Flight Package. The embedded documents appear in the Company Documents section you specified on the maintenance screen. Formats accepted are, .pdf, .jpg, .png, and .txt. An Attach Company Document dialog will appear when you select the Attach button. Select Choose File to open up a dialog box to select your file, once selected you can add it by selecting the Upload button.
Permit Rmks Button
The Permit Rmks button opens the Permit Remarks dialog.
IFPS Validate Button
The IFPS Validate button sends a validation request to EUROCONTROL for the loaded flight plan. This is only used for flights applicable to the EUROCONTROL zone. Any errors in the validation process will appear in the error bar and a failure icon will appear in the IFPS Validate button. A successful validation will result in a success icon appearing in the IFPS Validate button.
RAIM Validate Button
RAIM is not available to all customers, contact your Customer Success Manager for more information.
The RAIM Validate button sends a validation request for the loaded Flight Plan to the RAIM web service. Any errors in the validation process will appear in the error bar and a failure icon will appear in the RAIM Validate button. A successful validation will result in a success icon appearing in the RAIM Validate button. This can also be defaulted in FOMS Menu 170.
N-FP has the ability to add RAIM validation (i.e., pass or fail) messages to the flight package. This functionality is format-dependent. Contact support for more information on configuring your formats.
ADSB Validate Button
RAIM is not available to all customers, contact your Customer Success Manager for more information.
The RAIM Validate button sends a validation request for the loaded Flight Plan to the RAIM web service. Any errors in the validation process will appear in the error bar and a failure icon will appear in the RAIM Validate button. A successful validation will result in a success icon appearing in the RAIM Validate button. This can also be defaulted in FOMS Menu 170.
N-FP has the ability to add RAIM validation (i.e., pass or fail) messages to the flight package. This functionality is format-dependent. Contact support for more information on configuring your formats.